AI Integration
The AI Integration Microservice serves as a centralized platform designed to manage and simplify integrations with various AI providers. Currently, the microservice is integrated with OpenAI, allowing interaction with its AI capabilities.
How to Create an Assistant
- Create an OpenAI Account
- Visit OpenAI Signup and follow the instructions to create an account.
- Create an OpenAI API Key
After creating your account, go to the OpenAI Dashboard.
Navigate to API Keys.
Click Create new secret key.

Provide a name tag, select the project to be used, and set the desired security level (restricted, read-only, or full permissions).
Copy and save the API key in a secure location. You will not be able to view the key again, so be sure to store it safely for future use.
- Create an Assistant
Navigate to the Assistant Page.
Click Create.
Set a name for the assistant.
Write detailed instructions for how the assistant should interact. The system instructions are used by the assistant and should not exceed 256,000 characters.
Add the necessary files for the assistant’s knowledge base and activate the File Seach tool. The resources required depend on the tools the assistant will use. For example, the code_interpreter tool requires a list of file IDs, while the file_search tool requires a list of vector store IDs.

How to Create Agents in the XR Editor
- Create a Project in the XR Editor
Open your project in the XR Editor.
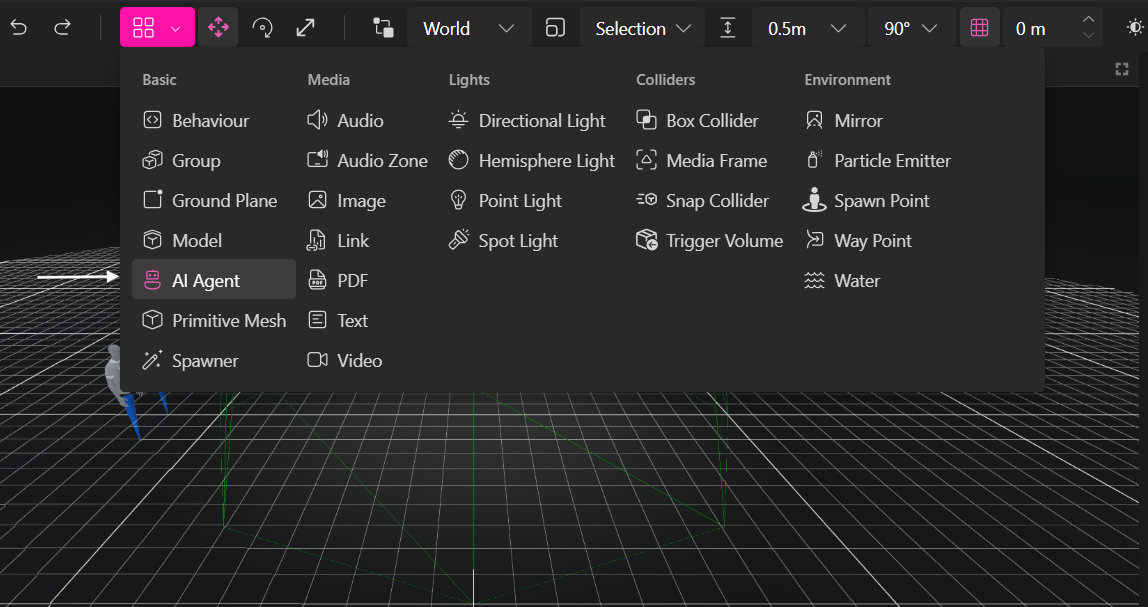
In the Elements menu, select AI Agent.

- Set Parameters for the Agent
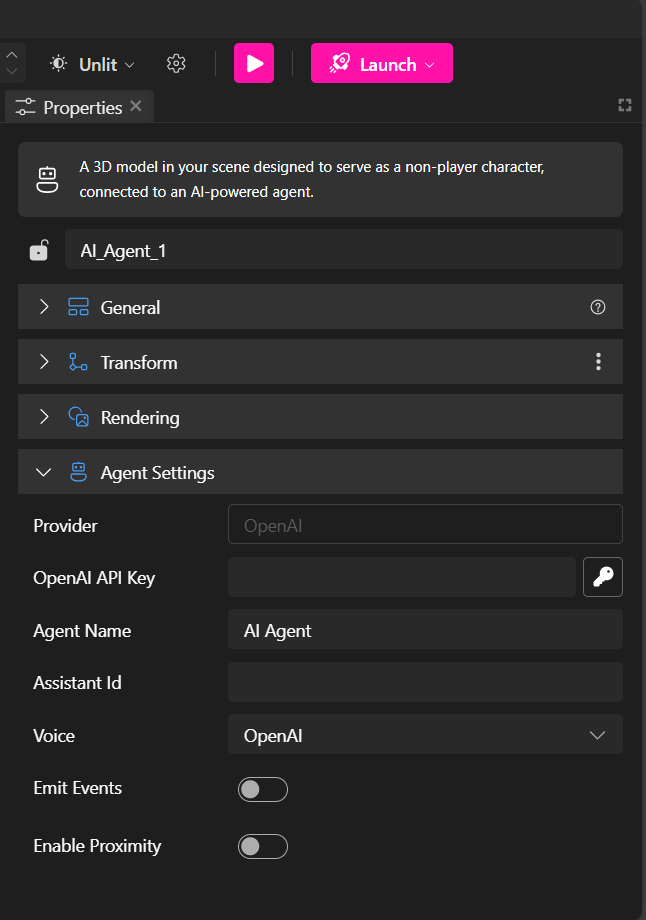
In the Properties Panel of the AI Agent, you can configure the parameters to connect your assistant.

Provider: Select the service that the agent will use to process user requests. Currently, only OpenAI is supported.
OpenAI API Key: Input the secret API key you created earlier. Make sure to encrypt this key before publishing the project.
Agent Name: The name that will appear in the chat interface.
Assistant ID: This is the knowledge base ID for the agent. For OpenAI, it starts with
asst_, followed by a unique identifier. You can find this ID below the "Name" input field on the OpenAI assistant page.Voice: Choose the voice strategy for the agent's responses:
OpenAI: Uses OpenAI’s voice generation.
WebAPI: Uses browser-based voice synthesis. Note that some browsers may not support this feature, and others may sound robotic. Google Chrome typically offers the best performance.
Silent: Disables the voice feature. The agent will only communicate through text chat.
Emit Events: Enable this to allow the agent to emit events for use in scripting. When enabled, the agent will emit the following events:
user-enter
user-leave
agent-talking
agent-thinking
- Enable Proximity: This feature triggers events when a user enters or leaves the agent's proximity range. You can also configure the agent to send a message when a user enters or leaves the proximity area.